


CRUD WITH REACT HOOKS
Photo by Alex Cheung on Unsplash
These are the things we are going to talk about below;
- Manage your data collection
- Understand how flux works with Context API
- Persist data with local storage yourself.
Prior, I had written an article on crud operation in vanilla javascript, where a product list application was used to demonstrate the CREATE, READ, UPDATE, and DELETE Methods successfully with LOCAL STORAGE.
Without further delay, let us get to the task ahead.
Prerequisites
- Installed node and npm on your system
- Know HTML and JAVASCRIPT
- Understands how REACT works.
Let us create a new react project. On your terminal run the below;
code .</span>
Above, we navigated to our desktop folder, we created a new react project called _datacollection, and we finally opened the project on visual studio code.
We have our project opened on the visual studio code, let’s run it using the vscode terminal;
npm start</span>
Go back to the project and create the context component that we will be working on during this project.
On the terminal, cd into the src folder, create a folder name data_storage, inside it create the files(components) we’ll be using later in this project
touch useContext.js form.js table.js thead.js tbody.js data_statistics.js</span>
Inside the useContext component, let us create our provider.
Let us understand a bit about context API and how it works before applying it to our project.
Context provides a way to pass data through the component tree without having to pass props down manually at every level. — React Docs
Context API holds a provider and consumer property. The provider property holds a prop called value, inside it is where we will be passing the values we want the children props to have access to. Below is a screenshot of the provider function and the context values that will be passed to the children props

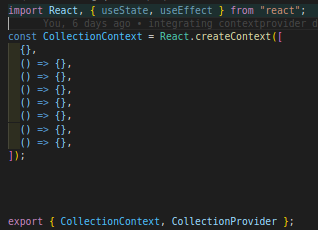
creating the context
We created a constant variable that holds our context values. We passed an array that holds an empty object with seven(7) undefined functions. We imported the useState, useEffect hooks that we will be using later in the project, exported the collectionCentext, and the provider function we’ll be creating in a known time.

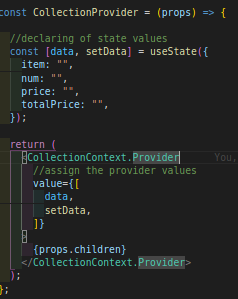
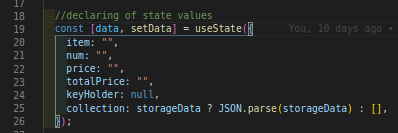
creating the provider func
As I promised, the screenshot is holding the provider function. We declared the data(state) options and pass it to the value props of the context provider.
Let us import the context provider function in the app component and wrap all the components that should have access to the context array with it.
The app component should look like so below;

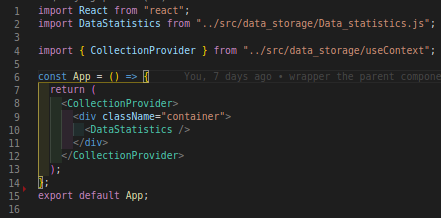
app.js file
In the app component, we imported the DataStatistics component(we will soon create this), and also the collectionProvider component.
The DataStatistics component is wrapped with the collectionContext provider to enable access to the provider values from children props
Let us move on to add some codes to the DataStatistics component that was imported to the app component.

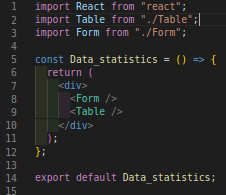
data statistics component
We imported the table and the form component which is returned as its children. Basically, without the use of context API, we would be doing things like passing props down to the form and table components, encouraging data flow in one direction, from the top to the last child.
Let us create the form fields that will be collecting the user-item/collection collectively.
Inside the form component let us add the below codes;

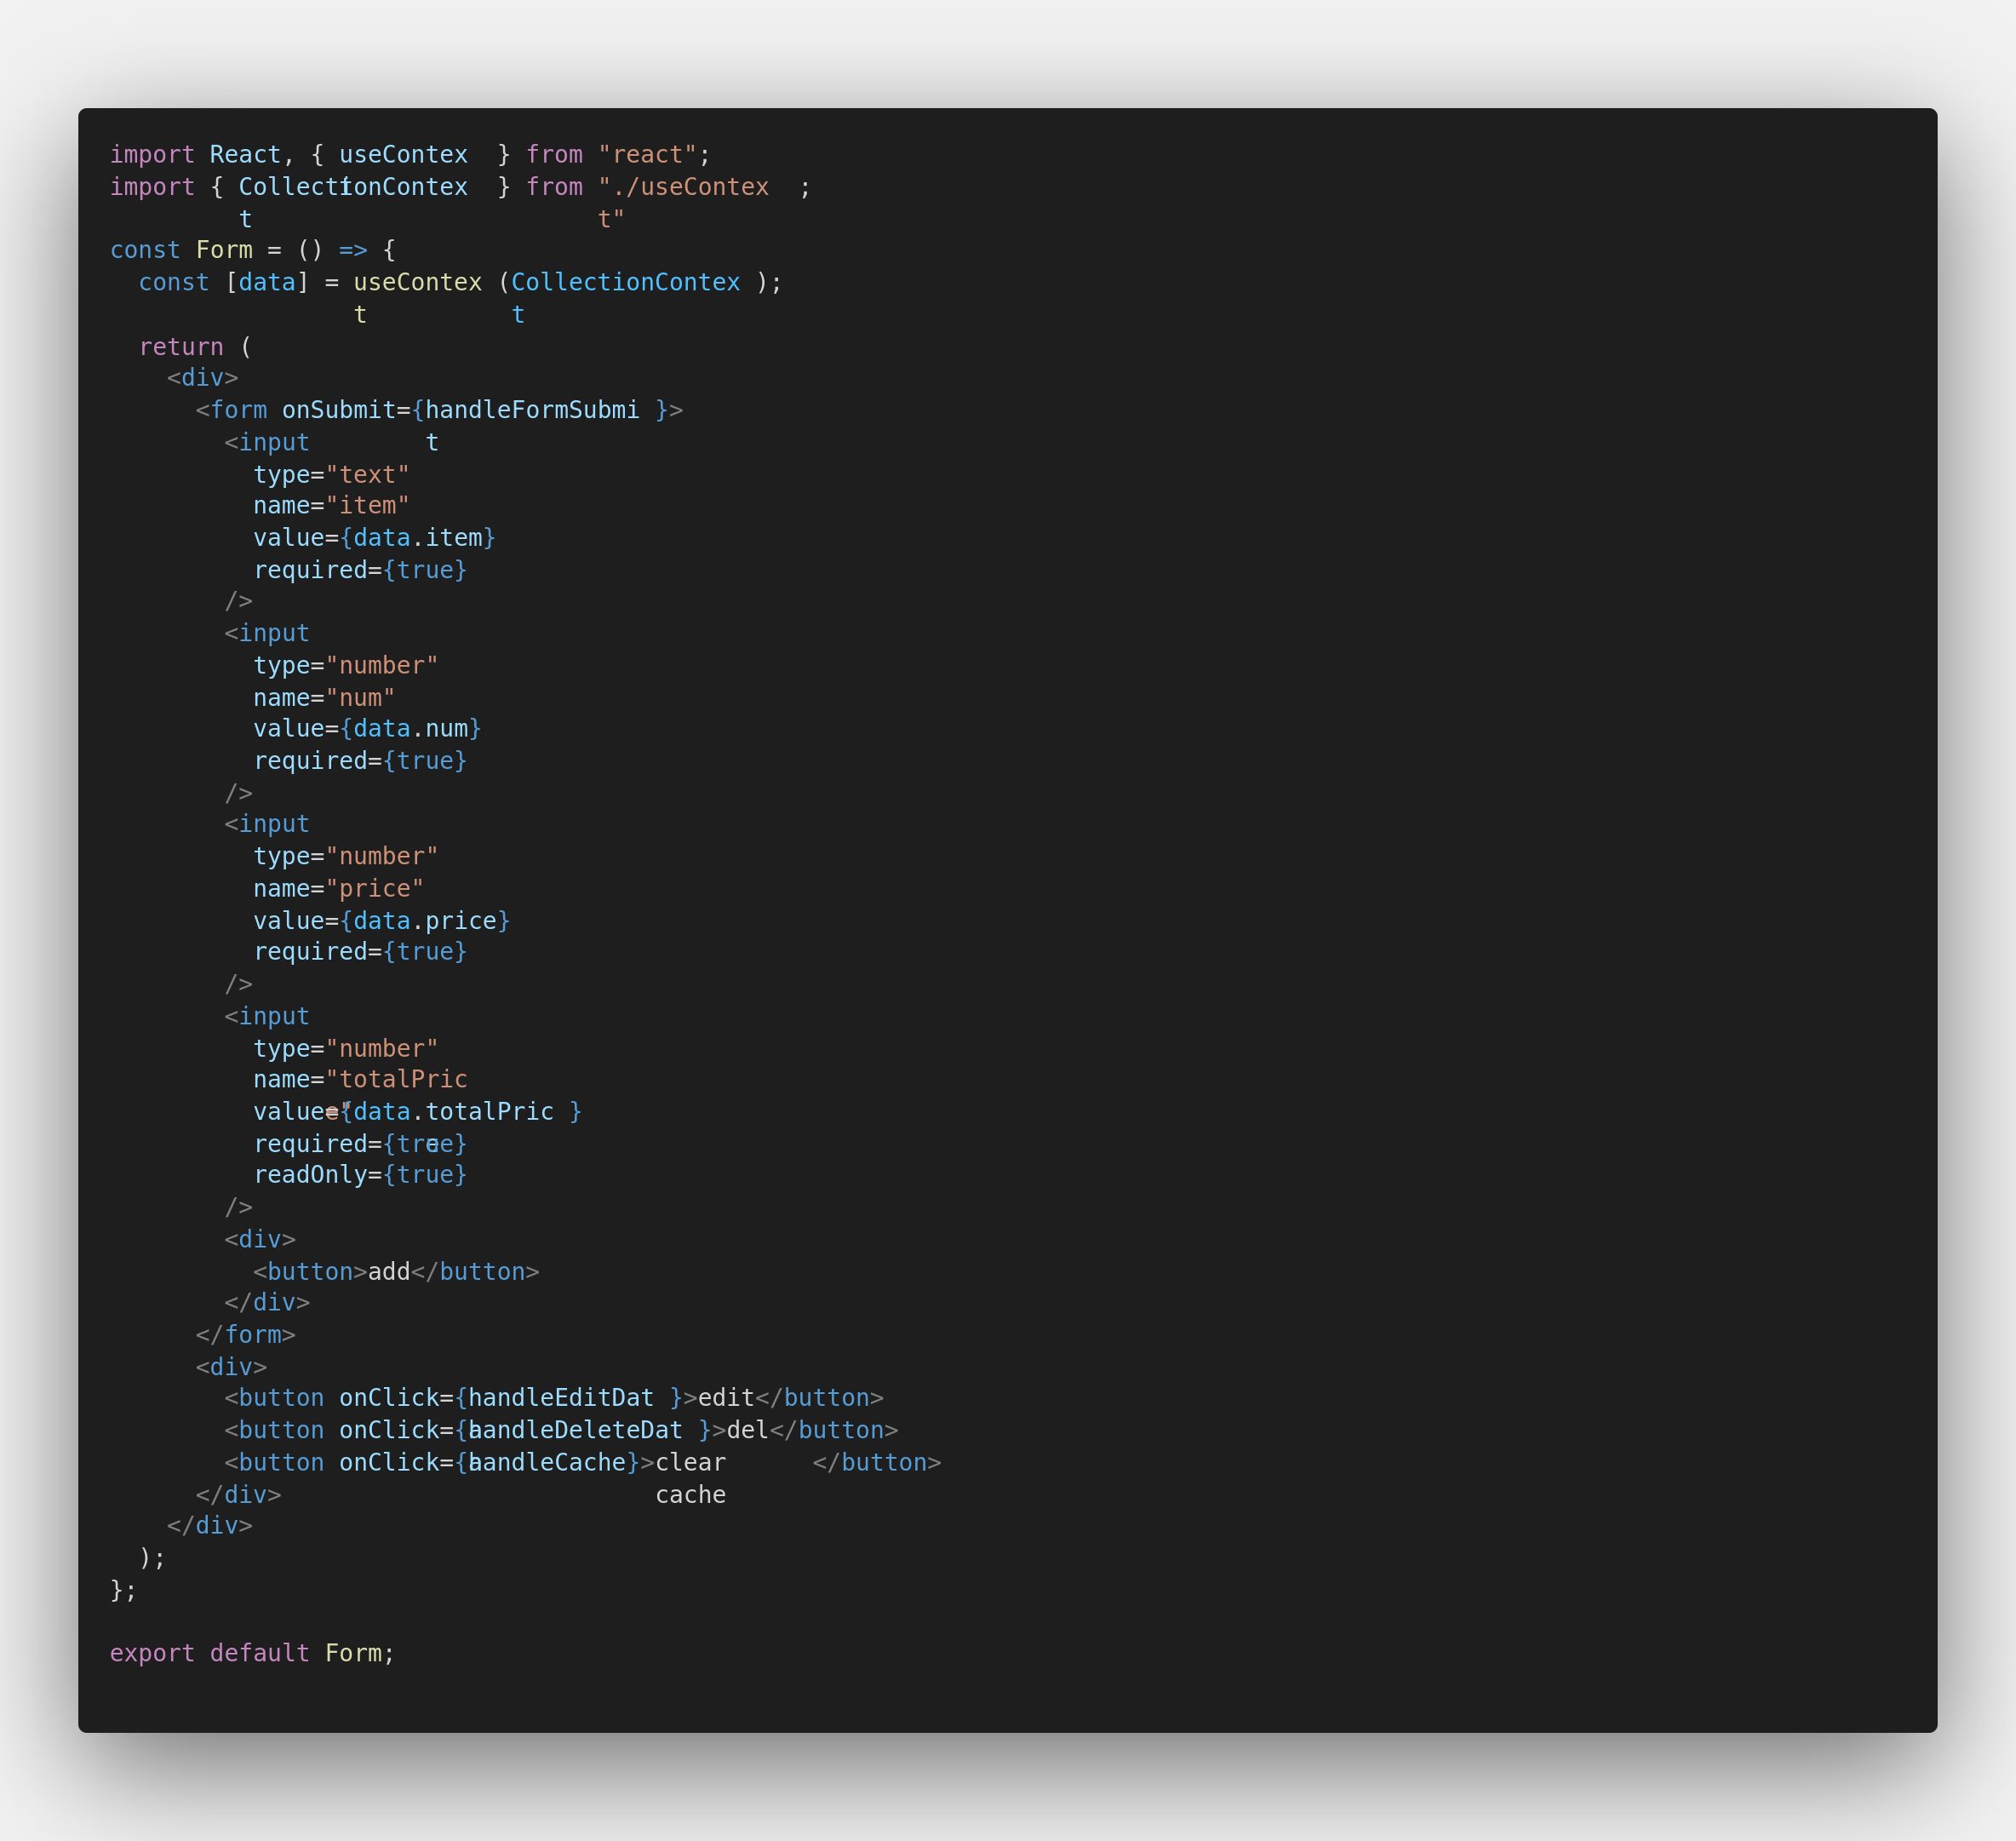
form.js component
We imported the collectionContext that is holding the context values and the useContext hooks API.
Extracting context in hooks, the context is passed inside the useContext API. By so doing, it gives us the power to access the provider of the context, This will be is similar to the below code if we were to use a class component
</form>
</collectionContext></span>
Like I said beforehand, context holds two properties known as the provider and the consumer. When defining the values you use the provider while consumer property is used to render the providers.
If you look closely in the above screenshot, no consumer property was used, rather we used the useContext that was imported and pass our context provider inside of it. This gives us access to context providers. Data was destructured from the provider like so;
const [data] = useContext(collectionContext)</span>
The form element is holding the input field. The data properties were assigned to the values of the input fields, also some function was passed to the form element which will run once the form is submitted.
Let us look at how and where that function was created. Inside the useContext component let us add the handleChange function


onChange func
The handleChange function is setting the user collections to the state. In the function, the target was destructured to get the particular input field at every change in the input field.
The setData is similar to the setState method in the class component. It is a function that gets the values of the input fields. It checks if the name value is defined in the data(state), if yes it loops through the data and assigns the input value to the data field that matches the name value of that input field.
Having done these, let us now add the handleChange function that will have created in the provider value like so below;

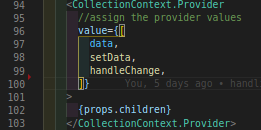
added the handle change to the value property
In the form component, destructure the handleChange function like so below.

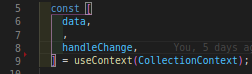
destructure the handlechange from useContext
Above is an array destructuring method, it was used to extract the context providers fromthe context to the children props.
Note: Array destructuring method was used because the contextProvider is holding an array. read more on destructuringhere.
Going forward, let us create the submit function like so below

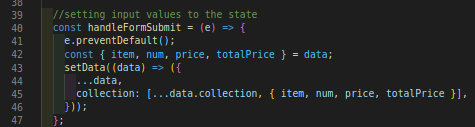
destructure the handleFormSubmit from useContext
Firstly, the form is prevented from trying to return avoid using the e.preventDefault method, the state values were destructured from the data.
We spread the collection property of the data and added the user collection(user form values) inside it.
Inside the useContext component, add the collection field as one of the data property like so;

collection property
The collection field is conditioned, we checked if storageData exist, if yes, we will parse the storageData. Else it will return an empty array. Currently, storageData is empty so the collection will return an empty array.
Now that we have created the handleDataSubmit function, let us go to the browser and take a look at what we have done so far…

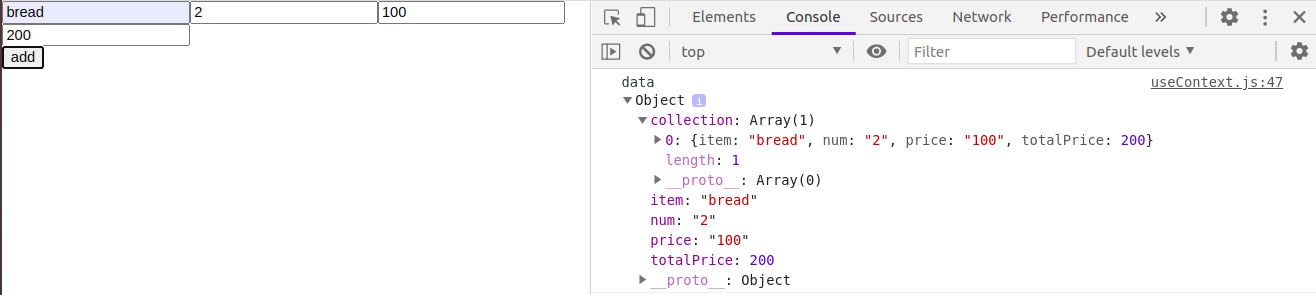
getting the form field value
Wow! our code is working effectively. We have just added some values and prints those values. Looking at the data object in the console, the collection array is holding the user collections, data also holds the input values as well.
Now that the handleChange and handleSubmit functions are working properly, let us create a function that will handle the total price calculation for us. Afterwhich, we will set the total price input as readOnly.


the handleCalculate func
We created a function that will handle the dynamic multiplication of the number of items and the price of the item for each collection. The Number constructor was used to convert the values of the input fields to a pure number.
Finally, we checked if the num field already has a value, if yes, it sets the total variable tothe state(data)
Note: All functions that are declared in the context are passed to the provider value props for it to be accessible to the children props of the context provider component.
Destructure the handleCalculation function from the useContext. Because we want the totalPrice field to be looking out for changes in the price field, we will pass the handleCalculate function to an onInput function props of price input like so below.

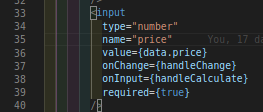
price input field
Going on, the totalPrice input will not be holding any function within it, the result of the item price and the number of items is set to it dynamically. Let’s take a look at the totalPrice input field below.

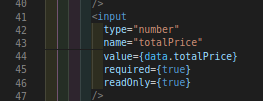
totalPrice input field
Above, no function was passed and the input was changed to read-only with the readOnly props of the input set to true. The readOnly method restricts users to add value to the input directly.
The form component is ready and working effectively. Let us move ahead to persist the user collections to the local storage.
CREATE COLLECTION
Use ctrl + p in your vscode to open the search file prompt box and quickly search the file you wish to open, in our case, it is the useContext component.
We will create a handleLocalStorage function to help us in adding the user collection to the local storage. Below is a screenshot of the function;

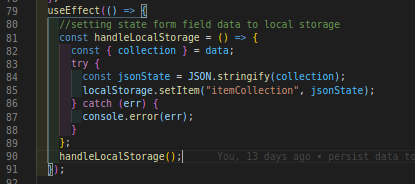
adding the collection to the local storage
The handleLocalStorage wasdefined inside the useEffect function. The useEffect method was used to update the data whenever the component is updated. The useEffect function is the same as componentDidUpdate in the class component.
Inside the handleLocalStorage function, the collection field was destructured from data(state). An error handler method called try…catchwas used to manage errors before setting the jsonState to local storage using the storage API setItem.
READ COLLECTION


getting the storage collection.

persisting the collection to the table
We got the user collection from the local storage and add it as a check to the collection field. this automatically reads the user data whenever the component updates. See a demo here.
Update Collection
In the table component we will import the Thead and the Tbody component, and return it as the table children props below;

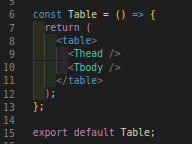
table component
Let us add some code to the Thead component as shown in the below screenshot

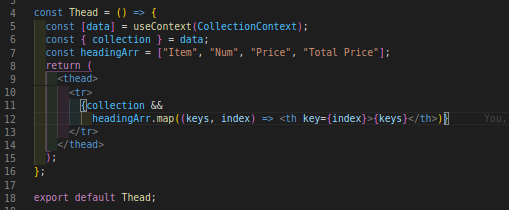
the table head component
The Thead component is returning a table row(tr) which holds a loop of the headingArr that was declared. First off, a check was made to check if the collection array is not empty. if it’s not, then a loop is made and finally returning the table heading(th) from the map.
Now that we have seen how we got the table heading and how it was rendered, let us go to the Tbody component and check things out as well with the screenshot below.

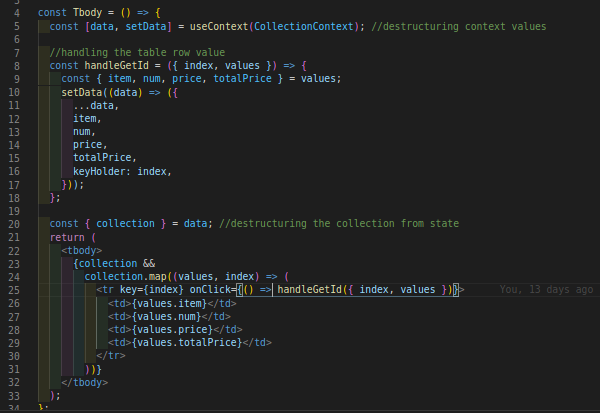
the table body component
The Tbody component holds a function that gets the index and values of each row(tr) that will be clicked. The derived values and index will be set to the data(state)
The component is returning the tbody which holds a loop of the collection array that is returning a table row(tr) and a table data(td) that is holding the collection values.
Let us add the handleEditData function in the useContext component below

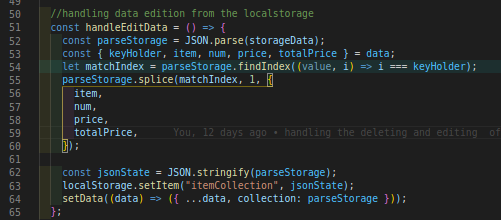
function to handle the editing of the collection
It’ssimple. As always I will take it one step at a time.
We looped the storage data to get the index of the collection that will be clicked for an update. We removed the collection that was clicked and update it with the current data of the data(state) using the splice method of an array. In turn, the updated collection is stringified and set back to the local storage
In other words, refreshing the browser before getting hold of the updated storage collection all the time will be a bit stressful, I figured out it will be good if the data can be synchronized once the storage data is updated. To do this, That was why the updated collection was also updated in the data(state)
DELETING COLLECTION

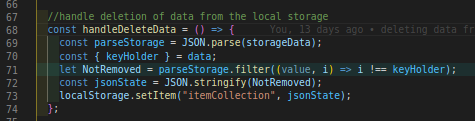
delete function
the screenshot lies the magic to the deleting of the collection from the local storage and the table. We parse the storageData, destructured the keyHolder which holds the index of the row that is clicked.
We looped through the parseStorage using the array method called filter method, this method was used to filter out the collection that was clicked and setting back the remaining collection to the local storage.
Last but not the least, after applying the crud operations I figured out it would be a good one to manage the clearing of all cache of the collection. So to this, I will be adding a handleCache function to help us do that.


cache function
This is a quick one, very simple I guess. Mind you, this function can make you want to go crazy if you mistakenly hit its button.
The data(state) collection was set to an empty array, finally, we returned the setItem method to enable us to sets the storageData to an empty array.
It is a great thing that we have finally gotten to the end of the bridge. To this, I want to believe that we all can now create a CRUD using react hooks and context API. Don’t forget to hit the clap icon.
Follow me to access the source code, check out the demo here. Follow me on my Mediumto see more of my awesome articles, you may also follow me on my LinkedIn. Thanks, I remain loyal.