


UPLOAD IMAGE IN CLOUDINARY USING MERN STACK
Photo by Reno Laithienne on Unsplash
As a developer, you might have come across this very challenge of uploading an image to any cloud source and also to allow your clients to upload an image to your database.
In this article, I will be walking us through the road to achieving this very quest, with ease using MERN STACK.
We will be using the following to achieve this;
- Reactjs
- Nodejs
- Cloudinary
- MongoDB
We will be using Reactjs for our frontend, Nodejs for our backend, Cloudinary as our cloud storage for the client images, and MongoDB for our database, where the returned image path will be saved.
prerequisite
- Know the basis of Reactjs
- Have npm installed
- Know the basis of Nodejs
- Have Nodejs installed
- Set up and install MongoDB compass
- Know the basis of MongoDB
- have a Cloudinary account
Moving forward, let us create a react project called CLOUDINARY_UPLOAD, follow hereto create a react project
Now that we have created a new project, let us quickly create the component that will be handling the client upload;
touch imageUpload.js</span>
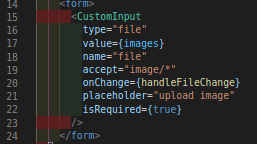
Inside the new imageUpload.js file we just created, add the following;

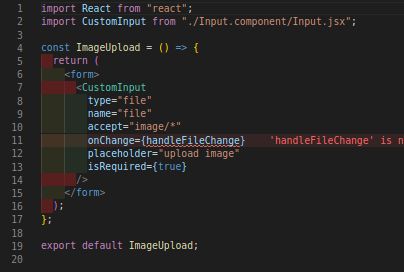
This is a component that is returning a form element that holds an input(custom input) element that has the props type file and accept image/*
The file value makes it possible for the input to take in it any file type, the accept property is to specify which file type we will be uploading. The handleFileChange in the onChange function is the file handler function that will be looking out for an onChange event on the input field.
Let us create the handleFileChange handler for the image field;
Firstly, let’s set a state that will manage the file value and the decoded image file. Before that, make sure that you have included the useState hooks in the react import params as shown below;


useState hooks
Having added the above, let us add the initial value of the state;


the state
Next, we are going to create the handleFileChange handler as shown below;

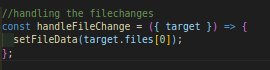
image handler
We have created a function to handle the file change. We destructured the target object from the input field and set the decoded image object to the state at every change on the file input.
If we print the target.files[0], we should see the following on the console;

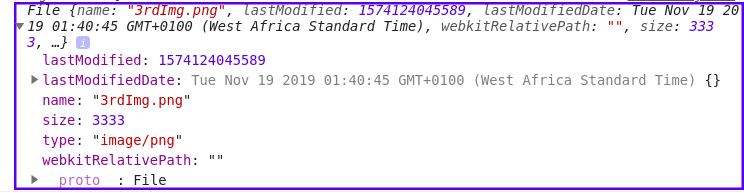
image prototype
As we have seen, the files[0] holds the full information of the image that was uploaded, and even additional information like the lastModifiedDate and so on. This exactly is what we are getting to the state on every change in the input field.
At this point, we can’t see the path to the image we have selected, because we have to create another state that reads the image path on every change and set it as the file input field value. Without delay, let us create the state for that;
const [images, setFile] = useState("");</span>
Inside the handleFileChange function set the target.value as the value of the images;

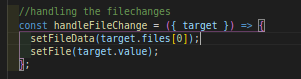
setting the image value
The file input field now looks like so;

The images(state) is now the value of the input field.
Progressively, we have been able to upload an image from our local machine with the handler we just created. Let us move forward to create a handler that will be sending the image to the server-side.


We created a submit function, and we are preventing it from returning void on submitting to the endpoint with the e.preventDefault function.
We are going to add a web API called FormData. It is a constructor used to create a new instance of a formData/storing of data and so on. Check the link to know more about formData.
We will use the FormData constructor property known as append, to add the decoded file object and send it to an endpoint for consumption.

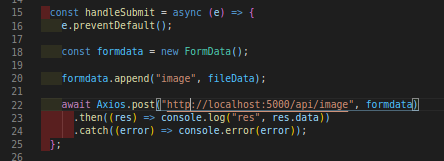
submit function
Above we created a formData object and appended a key(image), value(fileData), and finally send the data to the endpoints.
Note: make sure you have Axios installed in the project and import it to the uploadImage.js component as well.</span>
Go to the app.js file and import the ImageUpload component as shown below;

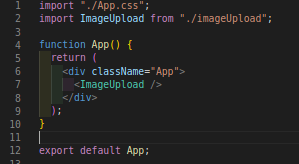
app.js
All these we have explained so far are all we need to upload an image and send the uploaded image to the server-side.
Henceforth, we will be working on the server to handle the request of the client and send the image to our Cloudinary account.
In the terminal, run
code .</span>
We returned to the root folder, navigated to the Desktop folder, created a folder named cloudinaryImage_server_side, created an index file with three other folders, and finally opened a new Vscode editor. The code . is only for those using Vscode for their development tool.
We are going to add the package.json file by running the following
npm init -y</span>
We are going to install all the necessary dependencies for this project as shown below
npm install express multer mongoose cors nodemon cloudinary multer-storage-cloudinary --save</span>
Now that we have the package.json file created, let us set up the server. Inside the index.js file, add the following code

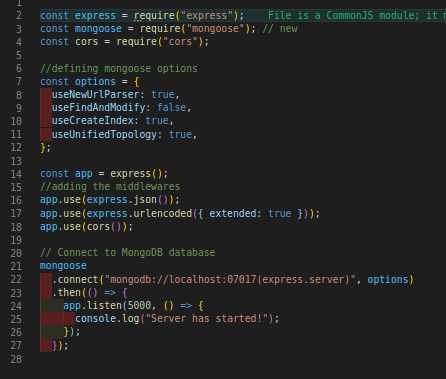
index.js file
Go to the package.json file and modify the script property. Add the following to the script object;

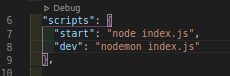
script object
With this been modified, let us start up our server with ;
npm run dev</span>
If you are seeing the below in your Vscode terminal, know that you have succeeded in starting up a node server. Server has started!
Open the model folder we created, create a file named fileUpload.js and add the following inside it;

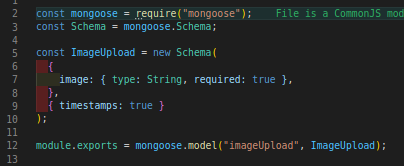
We imported mongoose, passed the Schema property of mongoose to the Schema variable.
We created a Schema for the request file upload and exported it to await an import in the controller file.
Having done that, we are going to create a file in the controller folder that will handle the image upload in the server-side
In your terminal, navigate to the controller folder and run
Touch uploadImage.js</span>
Inside it add the following;

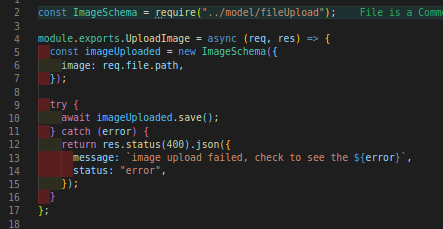
upload controller
This holds the upload controller for the request file. The image value is set as the req.file.path, req.file is where the returned image property from Cloudinary is set for use.
We will create a new folder called middleware in our root directory, this folder will hold a file called cloudinary.config.js. This file is where we will be adding the function that will be communicating with our Cloudinary account.

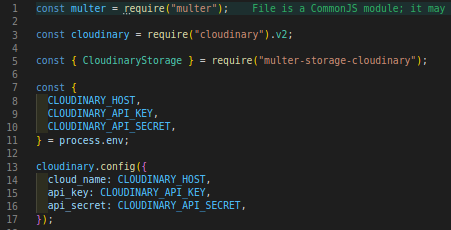
cloudinary config file
We imported the necessary dependencies we will need in other to successfully upload an image to our Cloudinary account. We destructured the Cloudinary criteria for the upload from the process.env file we will create soon. We used the Cloudinary.config method to input all those checks that are required by Cloudinary.
Now let us held to our Cloudinary dashboard and copy those criteria that are required for the image upload. The following is what we will need to copy from our dashboard;

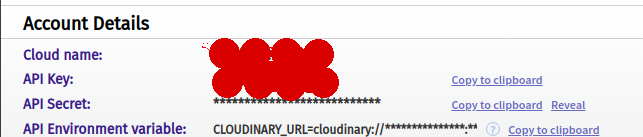
cloudinary pass details
Now that we have gotten all these details, we will create a .env file in our root path and add your account details needed in it for security purposes.
If we have done the above, let us continue and complete our Cloudinary config upload handler by adding the following in it.

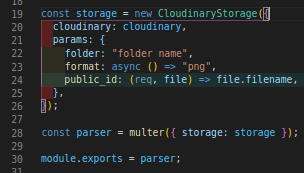
cloudinary storage
We used the CloudinaryStorage API to add all options we want to integrate with. The params field holds an object that will let us handle and manage the upload format, folder to upload the image to, and finally a unique public ID that you can use to access and perform other CRUD operations with.
Lastly, we used Multer API to store this intended upload to its storage property and export it to be used as a middleware in the post route we will create soon.
Moving forward, let us create a file named uploadImageRoute.js inside our route folder we created earlier. Inside it add the following;

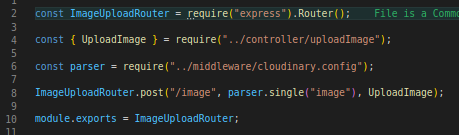
route file
We imported the Router method of express, the middleware that handles the Cloudinary upload, and the controller(UploadImage) that handles the saving of the returned image path to the database.
We used the post method of the imageUploadRouter to post the client request to the middleware down to the controller. Here, if the client request image didn’t meet the criteria required by Cloudinary, it will not pass the request to the controller. Afterward, we exported the ImageUploadRouter so we can use it in our index.js
In the index.js file, we will be importing the imageUploadRouter and add it as a middleware to the app.use method of an express method like so.


importing of the image upload router

Let us try to print the req.file and know what we are expecting from Cloudinary.


req.file
Amazing I guess, now we have successfully uploaded an image not just to our Cloudinary account but also to our database.
The req.file.path holds the online link of the image that was uploaded, this URL is what we are sending to the database so that it can be accessed in any browser.
If this article was helpful why not hit the clap icon 50 times. For the react code, you can find it here and for the server, follow me.
Follow me in my LinkedIn account and Medium account to see more of my awesome articles.